Cash + Carry THIS WEEKEND


Are you a fashionista looking for a great deal?  Looking for designer looks for a great bargain?  Well Cash + Carry is the place you need to be this weekend!  Join myself, Alive Magazine, and over 25 boutiques and indie vendors for this shopping event, where shoppers can get end of clearance sale items for up to 40-70% off!  Come shop with boutiques such as Blush Boutique, Cha Boutique, MACS Designs, Q Boutique & more!  The place to be is 1114 S. Brentwood Blvd, right across the street from the St. Louis Galleria to get your shopping on!  Tomorrow the event is from 6-9pm and Saturday is from 9am-4pm.  Tickets for tomorrow are $25 and Saturday are $10, what a steal!  I hope you all come join Mind of a Fashionista in supporting these boutiques while enjoying a great night of shopping!

Tickets: 

*this event is sponsored by Alive Magazine.


Corporate Chic; 3 Outfits That'll Win In The Office


Getting into the corporate world can be a little scary, and when trying to make a good impression on your co-workers you want to make sure you look depart.  I can't tell you how many times I've been in an office setting and seen women come in like they just came from the strip club...yes it was that bad.  So to avoid just god awful, unsitely mistakes, here are three corporate chic outfits to try the next time you go into the office!
Corporate Chic look #1


The first outfit is definitely one of my favorites.  I love a cute blazer and skinny dress pants because you can keep it very classy but you can dress it up or down depending on the situation or environment that you're in.  This outfit consists of a pastel palette, a cream blazer with a white chiffon blouse underneath and black skinny dress pants.  For shoes you have two options, you can rock the mid lavender pump or the pointed toe lavender flat.  This outfit would do well complimented with gold jewelry and natural makeup, and to top it off an all black square structured bag, good for toting around notes, tablets, and projects from the desk to the conference room and back.

Corporate Chic Look #2


This second look is more so two outfit options.  Once again I am bringing the blazer into the mix, an all white "angelic" blazer that can be paired with the color navy.  On the left, I love this navy floral skirt that will definitely give the office a flare of fun, but for someone who isn't so adventurous, a basic navy pencil skirt will do as well.  If you're going with the floral skirt I would suggest a basic white flat shoe and for the pencil shirt the pointed toe mid pump is great but both shoes will look good with both looks.  Silver jewelry would work best in these outfit choices, and a grey bag not only brings a different color into the mix, but compliments the navy really well.
Corporate Chic Look #3


The third outfit is another one of my favorites,the ever so popular but classic wrap dress.  It's very professional, classy, simple, but essentuates everything about a woman in the RIGHT way.  With this I decided to go with an forest evergreen and on top a basic white/cream cardigan.  Next is the brown knee high boot, it still allows you to be cute and fashionable at work, but you're not showing any leg at all!  And finally the "bowling" bag, great for a casual Friday when you won't have work to take home with you.

Other Workplace Fashion Tips
1.  Never show too much skin.  It can come off as unprofessional and somewhat "young minded"  Always keep an extra blazer or cardigan in your cubicle or car just in case you need to cover up.
2.  If you can't walk in heels, DON'T! Don't be the girl who struggles all day to walk in heels and instead of focusing at the sales meeting, everyone is gossiping about your tip toeing ass not walking right in those heels, just wear cute flats.
3. Develop your own style.  When at work, it's nice of your co-workers or even your boss to notice the little things you always incorporate into your outfit, such as cheetah print, or a particular charm bracelet you always wear.
4. Don't over do it.  This is work, not a fashion show.  And you never want your boss or co-workers to think you care more about your outfit than the project at hand.
5. Keep spares.  I am an advocate of keeping spares, and you don't want to be the one who walks around with spilled juice on the front of their shirt.  Keep basic colored shirts like white, black, and grey in your cubicle or car and extra slacks just in case of an accident...of any kind.  Also keep extra deodorant, makeup, and a lint brush to touch yourself up after lunch or a day out on business.

Can You Have Relaxed AND Healthy Hair?


One of the more popular trends within the African American community is to be natural, meaning discontinuing the use of chemicals that alter the hair's natural texture.  Although this is a great way to maintain a healthy hair lifestyle it does take a lot of work (I've tried, and epic-ally failed).  And there is also the notion, more so a myth that unless you rock your natural hair and resort to chemically processing your hair, then your hair isn't as healthy as it should be, or not healthy at all...is this true?  Well I am here to say absolutely not and I will explain why.

First and foremost there are pros and cons to being relaxed AND natural, but I believe a lot of the myth, more so fears came after a popular movie among our community, Good Hair by Chris Rock.  This movie explored every dynamic of "black hair" from weaves to beauty school, hair shows to the perceived thought on why African American women even decided to straighten or color their hair in the first place.  And finally, the in depth look on the process of "relaxing" one's hair by examining the chemicals that are used and seeing firsthand the process.  I will admit, this did scare me too after hearing some testimonies on how some women are "addicted" to it, and some women even experienced the breakage of hair and acquiring scabs on their scalp from getting too many relaxers, but that's the key phrase, TOO MANY RELAXERS.  Getting a relaxer can be a great thing, especially if you have hair that is very hard to manage in its natural state and you just don't want to put in the effort to maintain it yourself, you just have to make sure you do it in moderation, and here are the steps on how:

Get a PROFESSIONAL to apply your relaxer!
I can't tell you how many times my hair has been so f’ed up because I was so eager to get my hair  relaxed, so I let my mom, or my cousin, or a friend do it to avoid the cost.  Even though they may think they know what they are doing, unless they are a licensed hair stylist, they are probably missing key elements that could help your hair.  If you have to pay a little extra for someone who is really good, and takes care of your hair the way they should then it is worth the investment.

Relax your hair in moderation!
You don't need to relax your hair every time you see the first sign of "new gro" on your head.  That's too many chemicals within a short period of time which causes breakage, the stripping of your hair's natural oils, and not to mention the risk of acquiring lesions and scabs on your scalp, that sh*t hurts!  I suggest a time frame anywhere from 4-12 months in between each relaxer, it gives your hair time to breathe, regain those oils, and a chance to grow!

Find protective hairstyles
If you get a few protective hairstyles that are easy for you to maintain, you can easily go without a relaxer for up to a year!  For me I have a routine where I rod my hair with cold rods, and then I end up doing a few sew ins and then I save my braids for last.  Once I leave my braids up for 4-6 months and take them out it's been close to 11 months since I had my last relaxer.  By doing that, you make sure you have trained your hair to be able to take the chemicals in the relaxer properly so you can see all of the benefits with the finish product.  Also make sure in between each protective style (depending on the length you left it up for) get a professional to trim your ends, this will ensure your hair is growing the way it should.

Reduce the heat
Going along with protective styles, it is important not to apply too much heat as that can cause breakage.  While you are rocking your nice relaxed hair do, make sure to wrap your hair and hold it with a silk scarf.  This type of scarf won't cause your hair to dry out.  I also suggest getting a silk pillow case because if you're like me, you sleep wild and that scarf is on the floor by the time you wake up.  By taking these simple steps you reduce your need to use heat.  If you need to use heat, get a bottle of heat protectant, which you can pick up at Walmart or Walgreens, and apply to your hair before exposing it to the heat.

Wash Your Hair!
Now I know after you got your hair all nice and slicked back, you don't want to do anything to mess it up, but at the same time we have to make sure our hair is clean.  It is recommended that you wash your hair once a week and use moisturizing shampoo.  This is especially important for anyone who is relaxed.  Any "sulfate" free shampoos are more geared towards are natural friends, and from experience it leaves your hair hard, dry, and brittle which can lead to breakage.  Because of the relaxer, we have less of our natural oils than someone who rocks their hair natural, so they have the luxury of benefiting from a sulfate free shampoo.

Deep conditioning is your best friend!
Deep conditioning is the best thing you can do to your hair, especially when you are relaxed.  It simply promotes healthy hair by retaining the oils and restoring the moisture to your hair.  I suggest an overnight deep conditioning about once a month, depending on your hair type. When you deep condition you can add in oils such as olive oil or coconut oil since these are natural oils that have great benefits, and smell good too.  Wash your hair, section your hair off, apply a generous amount of conditioner, de-tangle, and let sit either overnight, or on a day where you can lounge around.  Then rinse in cool water and you will have the most soft and silky hair ever! 

What if I want to add color?
If you want to add color I suggest this.  Start with a base color like a black or brown permanent and then apply a semi-permanent (rinse) on top.  The reason I say this is because adding color to your hair is just like adding an relaxer, it is a chemical and done excessively it can damage your hair.  And with coloring, it sometimes can be irreversible.  By using a base color and adding a rinse, you can change your color when you want because the rinse is not permanent.  For example, I will be dying my hair back to all back, and then adding a semi-rinse of navy blue streaks.  This way I can still have my black but a pop of color that won't damage my hair.

Vitamins + Water = Healthy and Happy Hair
This is a tip anyone can use whether relaxed or natural.  Vitamins not only promote your body health, but can be very beneficial to your hair as well.  Biotin, which helps grow your hair and fingernails is something I suggest taking on a daily basis, along with your other daily vitamins recommended by your doctor.  Another great thing to do is to make sure to keep your body hydrated with water.  When you drink the recommended amount of water it helps your body keep in the proteins and nutrients it needs in order to do what it needs to do, which means grow your hair.  I suggest getting the ever so famous VOSS Bottle, it's about $2.50 at select retailers but it's worth the price.  A glass bottle you can re-use, and if you drink 2 and a half of those bottles, you would have drank the amount of water you need in a day, and it's a great bottle for detoxing!


Whether you choose to be natural or relaxed is up to you!  Please do not give into the trends if you're heart, time, and money isn't into it, you're just putting your hair through a crazy side chick type relationship.  If you decide to go relaxed, or stay relaxed, I hope these tips will help you achieve a healthier hair lifestyle while doing so!


The Soap Thats Washes All Your Sins Aways (We WISHED!)


Tom Ford Beauty Products

I'm still somewhat of a makeup/beauty newbie so my thought of "high end" beauty products would be something along the lines of Dove, but apparently I'm just wrong.  Scrolling through Facebook I see that Tom Ford has launched a new line of beauty products, including Tom Ford Oud Wood Bar Soap.  Now until today, I never knew of a designer who had their own bar soap! Like will this soap make me more fashionable? Will this soap wash away all my sins? For $35 it better!  Tom Ford has also included in the new line of products conditioning beard oil, bronzing gel, and oil-free daily moisturizer (which so happens to be $105).  At these prices some may wonder are you really paying for great skin care and beauty products or are you just paying for the Tom Ford Brand?  What do you guys think?  Would you pay $35 for a bar of soap or $105 for moisturizer from your favorite designer? Let's weigh in!
Ak Brown signature

NoteStream is HERE!


notestream

Here at #MOAF we are advocates of apps and gadgets that help us do more on the go, because let's face it, we are busy fashionistas! One of those gadgets to help you learn a little something each and everyday is NoteStream! What is Notestream?, well it's literally "the learning app for people too busy to learn", a helpful app launched in December that contains information such as liquor themed lessons, misleading food label facts, and ten simple tips for better photography.  All information on Notestream is available offline, so it's very convenient for when riding the metro to work, or if you're just somewhere and the Wi-Fi sucks balls (been there done that too many times).  And in efforts to reach every possible busy person out there, Notestream will be including fashion and beauty articles, and #MOAF will be one of many blogs contributing to this site!  We are very excited to partner up with Notestream in efforts to get our information out there to those fashionistas who may not have time to surf the internet and head to our page, so we are anxious for you all to try and explore our content plus many others on this new and innovative app.  This app is currently available for iPhone and will be available in Google Play within the next few weeks.  As far as our content, we will have it up within the next week and will let all of you know once it launches!  In the meantime download Notestream using the link below, feel around, and let us know what you think!

Ak Brown signature

DIY Saturdays: How to Dye Your Hair Extensions AT HOME!


ombre hait extensions

As a woman who loves to experiment with my hair I have recently been introduced to the world of weave.  So far I've gotten the same 12/14" blonde ombre Remi hair which I have realized costs way more than the basic single colors.  After researching and asking around I discovered you can dye your own weave at home, which (if you follow directions/know what you're doing) could be very cost efficient, easier than dying one's own hair, and healthier for your hair as well as these chemicals will not be going on your scalp, kind of a win win situation!  For those of you who want to try, here is the step by step instruction guide on how to dye your hair extensions at home!:

What You'll Need:
Hair Dye
Gloves
Developer
Plastic Bowl
Applicator Brush (optional)

1.  Comb threw the hair to get out any kinks and tangles.
2.  Mix the hair dye and the developer into the plastic bowl, making sure the mixture is well mixed together before applying to the hair.
3.  For an ombre finish, I suggest sectioning off your hair with a clip or rubber band on where you want your ombre to start, then apply the mixture with your hands (while your gloves are on of course!), then comb through the hair with the dye on it.
4.  Once you have applied the desired amount of dye onto the hair, place the hair in a plastic bin or towel and let sit.  Depending on what dye you purchased determines the sit time so read the box/bottle carefully!
5.  After the hair has sat for the allotted amount of time, rinse the hair in warm water, and then apply a conditioner.  I suggest a moisturizing conditioner because you do want this hair to feel soft and silky and the dye can damage this hair as much as it can damage your own, I suggest Pantene or Tresemme Color Treated Conditioner.  Comb through the hair with the conditioner on it and then rinse out with cool/cold water.
6.  Last but not least it is time to dry your hair.  You can either use a blow dryer or allow your hair to sit overnight to dry.

I will be trying this very soon, as I am experimenting with a new, bold color! Tutorial will be coming also! And in the meantime stay tuned for more DIY Saturdays on how to achieve the latest fashion, beauty, and home looks for less!


Exclusive Blogger Giveaway!!!

contest

Alright guys, we haven't done a giveaway in a while, but we wanted it to be something different and unique.  And after participating in a few Twitter parties with my fellow bloggers we have thought of a cool new giveaway!  Friday starting at 12pm CST we will be having a Twitter contest called "Name That Designer".  We will post five describing questions for five designers through our Twitter @mofafashionista and then we want each and every one of our fellow bloggers to weigh in on who they think the designer is.  For each question there is a winner and two runner ups.  For each question winner we will do a blogger spotlight + free ad space on our blog!  For each runner up you will receive free ad space on our blog as well! Tell all of your fellow bloggers, make sure to follow us @mofafashionista so you dont miss any of the questions, we will announce each of the winners that night!  Contest instructions will come the night before, if you have any questions until then you know how to find us!

ak brown

Make That Lipstick STICK!

There's nothing worse than your lipstick fading and feathering after a few conversations at the cocktail party or a few drinks at the bar during a night out on the town with your girls, or even on a date!

Here's a couple of tips on making your lipstick last all night long without multiple re-applications:


Fill It In!

One way to help your lipstick stay is to fill in your entire lip (top and bottom) with a lip liner that matches the shade of lipstick that you plan on wearing. If you don't have a matching lip liner, you can use a nude or even white liner to create that base that will make your color go on even and opaque! You're also able to create the perfect outline and shape to make your lips POP!


Lay a Good Foundation

Applying a layer of foundation to your lips in addition to your face will create a great solid base for your lipstick to stick to. It can also help make your colors pop and create an even color application because your base is a nude, neutral color that can be layered on top. Just be careful not to lose your lips! Ha ha!

With this, you can also use a liner to define your outline or create another unique shape for your lips like the heart shape, for example.

Prep & Prime

Believe it or not, using eye shadow primer/base is an awesome base for getting your lipstick to stay without barely smudging. This is my go to when it comes to making my lipstick stick. Especially when wearing something bold like a black lipstick. I first use an eye shadow primer and then layer an eye shadow base on top of that and from there, I layer on my lipstick!

It looks a little freaky when you put the product on, but the end result is AWESOME! I couldn't find a really good example of what it looks like, but I'm going to update this post with a photo as soon as I get a picture, but basically, your lips are gonna like you've been kissing powdered donuts. Ha ha!

LOVE LIVE THE LIPSTICK!

Oh yeah! Using these methods can make your lips feel really dry. Make sure that your lips aren't dry and cracking or that could create a HUGE disaster. We don't want cracked up and bleeding lipstick either. Simply applying a balm or moisturizer on nightly and before going out into the cold can keep your lips from being super dry and cracked up. If you want to moisturize a little while putting on makeup, apply a small amount to your lips and wipe it off before going about either of the three methods.

Share your favorite lipstick colors below. Sound off Fashionistas!

Designer Spotlight: Kris Cole of Prominent Sanctuary


prominent sanctuarySt. Louis gets overlooked sometimes as a center of fashion and style, but from the past fashion week in October, we can say that is not true at all!  And going to a school downtown you're able to see, breathe, and be surrounded by evolving talent everyday.  And one of those talents I had a pleasure of meeting and being around for a brief time.  Destini Gamble or "Kris" as she goes by is the creator and designer for Prominent Sanctuary, which means "the importance of being confident, comfortable, and secure in who you are and what
you wear".  

Destini focuses more so on women's apparel with this clothing line but is making the transition into menswear.  She defines her line as a mixture of fashion and art.  And it seems like this talented designer has been having the best first of the new year by booking 4 shows! Way to go Destini!  She will be showing her spring collection in the Red Winter Fashion Affair, the Sing & Strut Fashion Karaoke Event, Rush, and Erotica Fashion Xperience.  Please be sure to go and support this young talent, and more information, including purchasing tickets is available through the links below!


Wet Seal: One of the 90's Retailers Preparing to Say Goodbye


wet seal


If you're familiar with one of our previous posts "Bye Bye Arden B., Hello Wet Seal Plus" then you know that Wet Seal has been making a lot of changes within the past year.  They closed all of the Arden B. stores and replaced them with the new Wet Seal Plus.  We received one of the first Wet Seal Plus stores here in St. Louis, and from all of the hype of unveiling the store with the brand new merchandise, I had high hopes that this store would be here for a while...welp I was wrong.  Just last week while my mom was at the mall she noticed Wet Seal looked like a chaotic dessert, everything was everywhere. To top it off  you could get anything that would fit in a bag for $10. So after doing some investigating as I do, I learned that Wet Seal is in jeopardy of declaring bankruptcy, and is currently working with lawyers in handling this process.  According to MarketWatch.com, Wet Seal will be closing 338 stores and will be laying off nearly 3,700 employees.  Once this is done only 173 stores will remain in the chain.  Wet Seal is also in trouble with its bond holders because the company missed a bond payment of $28.8 million dollars, causing them to be further in debt.  Looks like the fate of Wet Seal is fast coming.  Me personally it might be time to put this company to rest.  It was opened and structured around the 90's generation and we are in a new world of fashion that Wet Seal barely kept up with.  I want you guys to weigh in, do you think Wet Seal should keep fighting to stay afloat, or should they just close for good?

Event Alert: Behold The Year of...GENT!


GENT!


I am so excited to announce on behalf of Brainchild Events and Mungenast Lexus the first all menswear independent designer fashion show in St. Louis, better known as GENT!  This is huge and the markings of history being made.  Being from St. Louis and experiencing the fashion scene here in this vibrant city, you become familiar with too many talented designers that tailor to the needs of the fashionable man, and now there's a show for them to shine!  Gent! was created by Brainchild Events to connect menswear designers with shoppers, retailers and media. As stated, this will be the first all menswear independent designer fashion show in St. Louis with designers including:
 
Paul Gibson is a St. Louis native that has had runway shows in LA, St. Louis, Cincinnati, Omaha, and Phoenix Fashion Week. He was also featured on America's Next Top Model. Paul is a contemporary menswear designer brand sold in higher-end retailers around the world. 

Christian is a Kansas City emerging designer that specializes in custom menswear pieces. He has showed in KC Fashion Week and Omaha Fashion Week. The christianMICHAEL design label has quickly become one of the most recognized and respected design labels in Kansas City.

Shan Keith is a St. Louis native who has shown in Project:Design!, Missouri Style Week and just finished competing in Under The Gun (Project Runway spin-off).

Jamal Mayers is a former professional Canadian ice hockey forward who played 15 seasons in the National Hockey League including with The St. Louis Blues. He is now designing custom suiting, ties and pocket squares. Gent! will be his first show and launch of his collection Champagne & Caviar Bespoke.  

Come and support this amazing and ground breaking event, get educated on men’s style, experience The Men’s Lounge, sip on cocktails and light appetizers, listen to DJ VThom and enjoy a stimulating runway show.  

Gent! is on February 26, 2015 and located at Mungenast Lexus St. Louis (13700 Manchester Rd).  Doors open at 6pm and the runway comes to life at 8pm. Advanced tickets are on sale at www.gentstl.eventbrite.com  or  www.brainchildevents.com. Advanced general admission is $20 and VIP is $45 (includes cocktails and guaranteed seating for show). Ticket prices at the door will increase to $30 for general admission and $55 for VIP. Percentage of ticket sales will benefit The Humane Society of Missouri.  Also be sure to RSVP to the Facebook event page as well: https://www.facebook.com/events/809337802457918/.  For questions regarding this event please contact Dwight Carter (Creative Director): dwight@brainchildevents.com or Katie Foster of Foster Relations (Media Contact): fosterrelationsllc@gmail.com


*this event is sponsored by Testosterone Shoes

9 Butt Exercises that are Better than Squats

New year new you right? With the new year a lot of us (including myself) have put on our New Year's resolution list that we will get fit and healthier for the summer to come, and a main concern for a lot of ladies is the toning and lifting of the butt. Well for this new year let's steer away from the traditional squats and try these 9 butt excercises that could be more beneficial than the squat (courtesy of Cosmopolitan Magazine).

 Single-Leg Glute Bridge 
Lie on your back with your knees bent and your feet flat on the floor near your butt and hip-width apart. Keeping your knees in line, extend one leg. On your exhale, squeeze your glutes and push your hips up toward the ceiling as high as you can go. Pause, then lower until your butt hovers right above the floor, and repeat without touching the ground.
butt exercises

Hydrants with Leg Extension
Begin on all fours with your knees hip-width apart and your wrists stacked over your shoulders. Lift your left knee toward the ceiling, then extend the left foot straight out to the side. Pause before you bend your knee again, and bring your leg back to starting position. Repeat for 45 to 60 seconds on the left side before you switch to the right.
butt exercises

Rainbows
Begin on all fours with your knees hip-width apart and your wrists stacked over your shoulders. With a pointed toe, extend your left leg behind you and slightly to the left side. It should be level with your spine. Keeping your core tight and leg straight, slowly lower your leg to tap the floor. Squeeze your glutes as you lift the leg back to starting position, then slowly tap the floor about a foot to the right. Return to starting position to complete the rep. Repeat for 45 to 60 seconds before you switch legs.
butt exercises

Curtsy Lunges
Stand with your feet shoulder-width apart and your hands on your hips. Keeping your hips square, cross your right leg behind you and step backward as you lower your right knee toward the floor. Your left knee should remain directly above your left ankle. Pause, then press into your left heel as you stand and extend your right leg into a side kick. Repeat for 45 to 60 seconds before you switch legs.
butt exercises

Heel-Lifted Squat
Begin with your feet hip-width apart and your left heel lifted. (For an extra challenge, lift the whole foot off the ground and extend your leg in front of you.) With control, push your hips back as you lower your butt toward the floor, bracing your core to help you balance. Don't let your standing knee come out over your toes. Pause, then press into your right heel to stand up into the starting position. That's one rep. Repeat for 45 to 60 seconds before you switch legs.
butt exercises

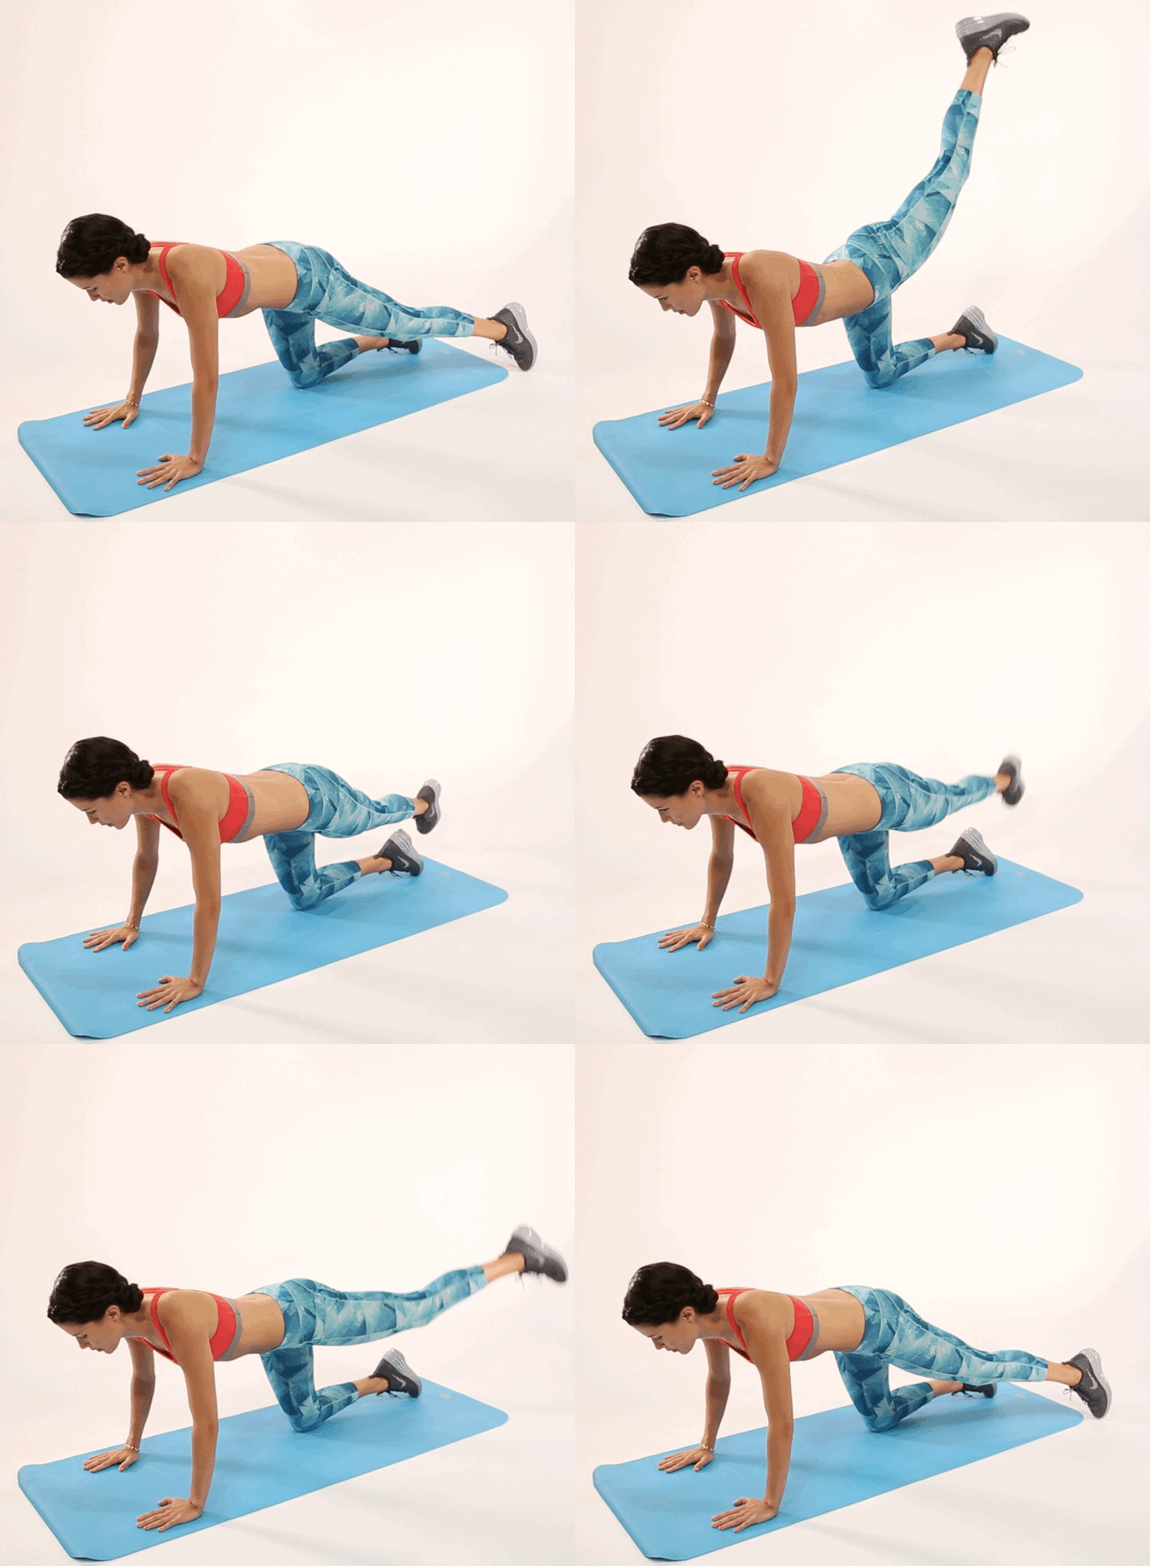
Bear Plank Leg Lifts
Begin in a plank position with your shoulders stacked above your wrists. Bend both knees slightly as bend your left knee to 90 degrees. With a flexed foot, squeeze your glutes, and raise your right heel up toward the ceiling as high as you can. Pause, then bring your left knee back to meet your right knee. Repeat for 45 to 60 seconds before switching sides.
butt exercises

 Single Leg Dead Lift
Stand with your feet hip-distance apart and your right foot a few inches in front of your left. The left knee should be slightly bent. Draw your abs in and slowly fold forward, keeping your left foot in line with your spine as you reach toward the floor with both hands. Pause, then return to starting position. Repeat 45 to 60 seconds before switching sides.
butt exercises

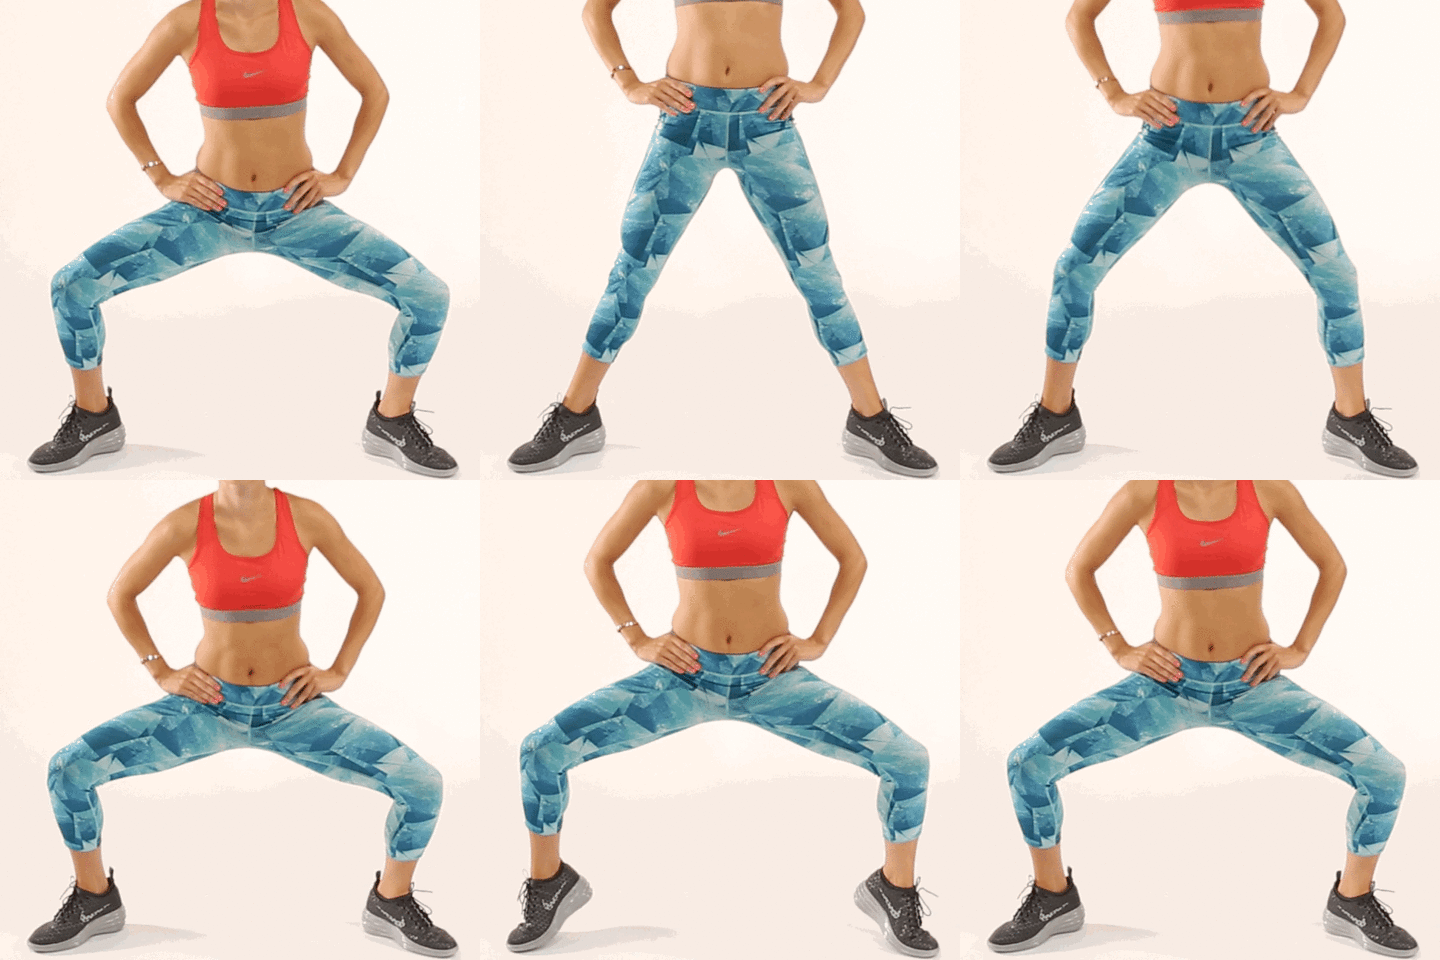
Sumo Squat to Calf Raise
Begin with your feet about twice hip-width apart, toes pointed slightly outward. Keeping your knees above your ankles and abs drawn in tight, push your knees back as far as you can and lower your hips toward the floor until your thighs are parallel with the ground. Raise both heels off the ground slowly and with control. Pause, then slowly lower your heels. That's one rep.
butt exercises

Squat to Sumo 
Begin with your feet about hip-width apart and your toes pointing forward. Keeping your knees directly above your ankles, sit back into a squat. Press into your heels and pulse in this position as you turn both feet out about 45 degrees, then back to the starting position.
butt exercises

  *photos and exercise info provided by Cosmo.