Hey guys, so a lot of my friends have been asking me to do a tutorial on how to destroy, distress, and bleach jeans after they saw a pair I did recently, so I said hey why not lets do it! This is actually going to be 2 tutorials in 1, because I turned some baggy jeans into high waisted skinny jeans, and then used those jeans and turned them into a pair of high waisted, distressed, destroyed, and bleached jeans.
What you'll need:
- baggy jeans
- sewing machine or needle and thread
- pins
- scissors
- tweezers
- rubberbands
- water
- bleach
- bucket
The initial step that I did was go to my local Goodwill to purchase a pair of jeans. I recommend to go in not looking for some that are your exact size, just aim for something very baggy, even going into the men's pants section. I found these Levi's in the women's section but I think they are a pair of men's pants, and they were only $4.00.
Step 1: Your first step is to turn your jeans inside out and put them on. Once you have them on inside out you'll want to pin on the outersides and innerside of your pants where you want to bring the pants in at, at this point it would be very helpful to have someone pin your pants for you.
Step 2: Make sure while you are pinning your pants to leave a little bit of room, there is a chance that you will mess up or you might decide to bring the pants in just alittle bit more, it's always good to go lose at first then tighten along the way so you dont have to start completely over.
Step 3: Now it's time to get your sewing materials together. I always choose my thread first, either going with a grey, white, or denim blue color, depending on how light or dark your jeans are.
Step 4: Prepare your sewing machine. For those of you who have a sewing machine but havent used it in awhile I highly suggest watching a quick sewing machine basics video on Youtube to refresh your memory. You want to make sure that you are using your machine right so you dont damage it, or your jeans. You can sew your jeans by hand if you are not comfortable using a sewing machine but it will take much longer.
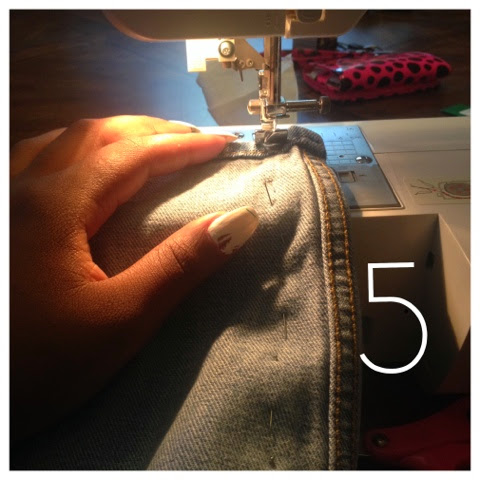
Step 5: Sew in a straight line following the pattern you marked with your pins, once again make sure to leave alittle room just in case you mess up or decide to change the fit of your jeans later on.
Step 6: Once you are done sewing and have decided the fit is what you desire, cut the excess denim off before turning your jeans back right side in.
As you can see from my before and after pic, my once baggy pair of levi's are now transformed into a cute pair of high waisted skinny jeans, now it's time for the fun part!
Step 7: You'll need a pair of scissors that will cut well into your fabric, I suggest fabric scissors or shears but really any pair of scissors will do for this project.
Step 8: Begin to make slits into your jeans in any pattern you want, I always find that unstructured patterns turn out the best.
Now you're ready for some distressing!
Step 9: You will need a pair of tweezers for this step, I actually suggest the big pair, I think those will work much easier.
Step 10: You're going to use two slits that you cut into your fabric and pull the blue threads going vertically between them, exposing the white horizontal threads in the end. Once you pull the first thread the rest will come easy. You can make as many patches as you like.
Step 11: You will need rubberbands for your bleaching process, I got these in a big bag from the Dollar Tree.
Step 12: Start from the bottom of your jeans, bunch, and rubberband as if you were tie-dying a t shirt, you can roll and bunch in any way you like.
Step 13: You will need to lay out a plastic bucket (such as a mop bucket), water and your bleach. I suggest doing this outside to avoid bleach stains in the house and unwanted bleach fumes. Also at this stage I suggest changing into something you dont mind getting stained. The transfer of your bleach, especially from the dripping from your jeans can stain your clothes. Once that is done you will need to measure out your water and bleach. For my jeans I used 5 cups of water
Step 14: Next I used 10 cups of bleach. You can measure just using a red party cup. I used a ratio of 2:1 because I needed to wear these jeans to an event the same day, but I have used a 5:3 ratio (5 cups of bleach to 3 cups of water) which works just as good, just takes a little longer, it also depends on your denim color as well. WARNING: DO NOT USE BLEACH BY ITSELF! When bleaching anything you need to dilute your solution or you will ruin your garment!
Step 15: Pur your jeans into your solution and let sit, depending on how light you want your jeans to be will determine the wait time, I let mine soak for about 2 hours.
These are what my jeans looked like after they were taken out of the solution and unbanded.
Step 16 (optional): If there are spots on your jeans you want to be lighter you can take your same solution and put it in a plastic spray bottle. Lay your jeans on a trash bag outside and spray the desired spots.
Step 17: Now it is time to wash your jeans. The first time you wash your jeans they need to be washed on COLD WATER WITH NO DETERGENT. Then once they are washed dry them.
And here is your final product! Before you wear you'll probably want to wash your jeans again, your usual way you wash your jeans to eliminate the bleach smell. Hope you all enjoy!


.JPG)
.JPG)
.JPG)
+-+Copy.JPG)
+-+Copy.JPG)
+-+Copy.JPG)


.JPG)
.JPG)
.JPG)
.JPG)
.JPG)
.JPG)

.JPG)
.JPG)
.JPG)
.JPG)
.JPG)

.JPG)
.PNG)
.JPG)
.JPG)